My DIY Craft Fair Display


Yesterday I was a vendor at the St. Theodore Tea and Fashion show and I needed a display to put my jewelry in! I spent exactly zero dollars on this, and just used things we had lying around the house! Somehow it still managed to look pretty professional and now I want to do more craft fairs just to use it! (I don't know if I'll be able to this summer, because it's such a time commitment--- we'll see!).

I know that most of you won't have supplies like these on hand, but I always like to see how others come up with solutions for things even when I don't have the supplies on hand. It usually helps me to think outside the box-- something I had to do a lot of for this display. No way was I going to spend $100 or more buying the "real" supplies that "real" artists use at fairs. I can buy beads and wire instead! :) The only item that I personally bought was the white necklace stand, and I got that months ago to use in photoshoots.


As I thought about putting a display together, I kept thinking about height-- no one likes bending over to see things!

The main part of the display is an unfinished oak kitchen cabinet which my Dad bought for $20 because it was damaged. We haven't given it a proper home yet, so it was out in the garage receiving a coat of cobwebs. It's heavy, but not too heavy to carry by myself.


The earring racks are two pieces of thin wood which I cut into rectangles with the scrollsaw and drilled dozens of holes into. The only downside is that a couple of the earrings get stuck in the holes-- they aren't too hard to get out, but they aren't too easy, either. It does make it easy to transport because none of them fall out on their own!

(By the way, I'm curious to know how other artisans price their jewelry for craft fairs. I rarely have more than one of any item on hand, except the ever-popular Evenstar collection, and it's tedious work to put a price tag by every item. Online, I can set each item to the exact price for my supplies and time. I would up compromising yesterday and averaging out the price of items to the nearest even-dollar increment. This meant that I had $7 and $14 earrings on the same rack, priced at $10. It's not ideal but for a one-day event I didn't know what to do!).


The strip lights are something that Dad had in the garage-- something for his truck, I've no idea what they are exactly but they are battery operated and stuck to the top with double-sided tape!

The bracelets are all resting on an empty roll of wrapping paper which I covered with part of a papery fabric tablecloth-- the same one that I use to wrap orders in when I run out of fabric or organza bags!


I put all the cuffs on the bottom of the display and gave it some height using glass from picture frames and wooden blocks.

I'm pretty proud of the hooks for the guitar string bangles and chainmaille keychains! I made it out of this giant roll of cheap aluminum wire I have on hand.


I was trying not to damage the nice cabinet so I used masking tape-- it was just strong enough but I was afraid it would fall down as people fingered the items! (it didn't!)


We had this wooden box lying around with knickknacks in it. I rolled up some fabric into little rolls and laid them side by side to display my rings properly. The cheaper plain wire rings and guitar string rings got jumbled up on the left because I had too many!


The necklace display is made from the cabinet doors. It wasn't ideal-- I think that necklace displays do a much better job of showing off my full necklaces. If I do any craft fairs in the future I will reserve these door displays for the pendant necklaces only. It works *great* for that!


The doors were just propped up on a basket and a book. They also have wire hooks taped to the back.


Lookie! Lookie! More Evenstar colors! It turns out that it's very difficult to find the leaf beads that I use for the Evenstar sets, especially when the website I usually buy from stopped carrying half the colors. Other places have them for crazy expensive prices. Think 50 cents or a dollar a bead. Then I found Brightling Beads and Shipwreck Beads so now I have every color they have in stock. Lots of new Evenstars!

I also will start using silver-plated chain instead of aluminum for the Evenstars. The aluminum I had before was cheap but wasn't up to par.

Anyway, the Evenstar necklaces and Enchanted Forest earrings are on another thin sheet of wood. I drilled holes for the earrings and nailed nails in to hang the pendants up.

The sapphire blue set is on the necklace stand that I made with an old book and a cereal box-- check out the tutorial here.

This is the necklace stand that I bought at Michaels awhile ago, and a folded-over index card (the perfect earring display in a pinch!). 

This necklace very similar to the Eowyn necklace I made a few months ago, only (*cough* if I may say so myself) better made.


It's the first new item that I've had a chance to put up on my Shoppe-- check it out!

Hope you liked this peek at the jewelry display I dreamed up!

ازرار CSS لمدونتك ومن تصميمك

create css buttons
ازرار Css Buttons أصبحت رائجه ومستخدمه من قبل كثير من المدونين نظراً لأنها تضيف لمسة جمالية للمواضيع وأيضا هي مميزة ولافتة للإنتباه فيراها القارئ بسهولة وهناك الكثير من الإضافات الجاهزة لصنع تلك الأزرار لكن هناك حكمة شهيرة تقول " لا تعطني سمكة ولكن علمني كيف أصطاد "
وهذا ما سنتعلمه وهو طريقة صنع تلك الأزرار بحيث تصنع الزر الذي يتناسب مع الوان مدونتك ويتطابق معها 100% وسنستخدم لعمل الأزار موقع متخصص في صنعها , هناك مواقع كثيرة لصنع الأزرار لكن الموقع الذي سنستخدمه هو أسرعها واسهلها في التعامل لدخول الموقع اضغط على الزر التالي وهذا الزر مثال للمعانية 


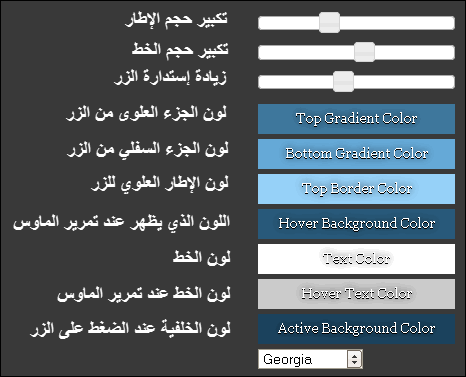
وهذا شرح لقائمة تنسيق الأزرار الخاصة بالموقع

CSS Button Maker
والفديو التالي هو توضيح عملي لطريقة صناعة الأزرار واستخدام الموقع

وهذا هو الكود الناتج من عملية تصميم الزر

.button {
   border-top: 1px solid #de8200;
   background: #f78000;
   background: -webkit-gradient(linear, left top, left bottom, from(#fcc565), to(#f78000));
   background: -webkit-linear-gradient(top, #fcc565, #f78000);
   background: -moz-linear-gradient(top, #fcc565, #f78000);
   background: -ms-linear-gradient(top, #fcc565, #f78000);
   background: -o-linear-gradient(top, #fcc565, #f78000);
   padding: 7px 14px;
   -webkit-border-radius: 29px;
   -moz-border-radius: 29px;
   border-radius: 29px;
   -webkit-box-shadow: rgba(0,0,0,1) 0 1px 0;
   -moz-box-shadow: rgba(0,0,0,1) 0 1px 0;
   box-shadow: rgba(0,0,0,1) 0 1px 0;
   text-shadow: rgba(0,0,0,.4) 0 1px 0;
   color: #000000;
   font-size: 19px;
   font-family: Georgia, serif;
   text-decoration: none;
   vertical-align: middle;
   }
.button:hover {
   border-top-color: #fa0519;
   background: #fa0519;
   color: #ffffff;
   }
.button:active {
   border-top-color: #2faafc;
   background: #2faafc;
   }

هذا الكود يضاف فوق الوسم ]]> ولكن طبعا تحتاج لضغط سهم توسيع عناصرا لستايل

أهم الملاحظات حول الكود

هذه الكلمة button  والمتكررة ثلاث مرات هي معرف الزر ولهذا يفضل تغييرها بكلمة من عندك تميز الزر
مثلا نكتب buttonred أو أي كلمة المهم ان لا تكون بها مسافات
وإن أردت ان تضيف أكثر من زر كل ما عليك ان تقوم بتنسيق الزر باللون الذي يعجبك ثم تغير المعرف الخاص به وتضيف الكود الخاص كما فعلت بالزر الأول وهكذا
الرقم 19 هو حجم الخط يمكنك تغييره كنوع أكبر من التحكم
أما هذا الكود    font-family: Georgia, serif; هو وسم الخط وان كنت تستخدم خط مخصص في مدونتك استبدل الوسم بوسم الخط الخاص بك

طريقة استخدام الأزرار في المواضيع

قم بتحويل صندوق المواضيع من وضع التأليف الى وضع HTML
ثم أضف الكود التالي في المكان الذي تريد

button" href="#" rel="nofollow" target="_blank">Word

نستبدل Word بأى كلمة نريد مثل تحميل معاينة أى شئ
ونستبدل هذا الرمز # بالرابط الذي نريد الزر أن يفتحه عند الضغط عليه
ونستبدل button بمعرف الزر الذي سنستخدمه
هذا الكود target="_blank"  معناه أن الرابط سيفتح في صفحة جديدة ان اردته أن يفتح في نفس الصفحة قم بإزالته


 الى هنا انتهى موضوعنا وبالتوفيق للجميع 
دمتم في أمان الله

Preparing for a Craft Show

This Sunday I will be selling some of my jewelry at the St. Theodore Tea and Fashion show-- local friends, please come stop by! There will be lots of good food and fun, and it all supports the church's mission trip.

Here's a sneak peek at some of jewelry I've made in the past three weeks.

(These first few pictures are from my Instagram account-- @ShealynnsFaerie. It's a weird story why I have an account when I have to use my mom's phone to do it, but basically one of my youngest brothers signed up without permission and now I have to monitor him. What better excuse to start posting my own over-edited, blurry snapshots?)


These are some brand-new chainmaille bracelets! I've been having fun with my two favorite weaves: the Byzantine (lookie at the blue and green ombre!) and the two-in-two mobius. I've also made some bracelets with the Shaggy Loops pattern, the European 4-in-4, and the Persian box weave.

Basically, lots of fun. These are my favorite bracelets to make and to wear. ^_^ I'll photograph them properly later!

Behind the bracelets are some guitar string earrings.


Earrings! These are all on a display that I made all on my own with some scrap wood. I'll take some pictures of my displays this weekend and write up a blog post with tips and tricks later!
One of many necklaces made with my favorite beads ever-- the Czech glass pressed into leaves!


Also hard at work on two of Aurora's crowns!
I made Evenstar sets in every single color I could get my hands on.

The teacup is there because of Tea Trolling. :)

My brother kept pestering me to upload pictures to Instagram the moment I created an account, and I couldn't find anything to post except for the teacup I was drinking out of at the time. So I spammed him with funny pictures of tea or just the teacup in different places. ^_^ If anyone else likes taking funny pictures of tea, use the hashtag #teatrolling. 'Tis fun. Especially when you have little brothers who call tea "dirt water." Tea trolling rankles them. (I'm such a lovely big sister.)

I'm off to go write some essays, drink some tea, and put the finishing touches on the displays! What are you all up to this evening?

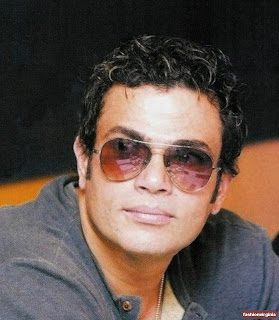
صور عمرو دياب 2013 روشة - اجمل خلفيات عمرو دياب روعة - احدث صور عمرو

من منا لايعشق عمرو دياب واغانيه التي يسمعها ويعرفها الكثيرين فلذلك قمت باحضار صور عمرو دياب لكل الناس التي تعشق عمرو دياب وهذه الصور من اجمل صور عمرو دياب هذه الصور تصلح لان تكون خلفيات عمرو دياب للكمبيوتر او للموبايل ايضا تصلح لان تكون غلاف فيس بوك عمرو دياب زي معودنامكم ديما في موقنا ازياء فرجينيا علي تقديم كل ماهو جديد قمت بتجميع احلي صور عمرو دياب 2013 .
والان اترككم مع احدث صور عمرو دياب بجد هي من اروع الصور
صور عمرو دياب 2013
صور عمرو دياب 2013

صور عمرو دياب 2013
صور عمرو دياب 2013

صور عمرو دياب 2013
صور عمرو دياب 2013

صور عمرو دياب 2013
صور عمرو دياب 2013

صور عمرو دياب 2013
صور عمرو دياب 2013

صور عمرو دياب 2013
صور عمرو دياب 2013

صور عمرو دياب 2013
صور عمرو دياب 2013

صور عمرو دياب 2013
صور عمرو دياب 2013

صور عمرو دياب 2013
صور عمرو دياب 2013

صور عمرو دياب 2013
صور عمرو دياب 2013
من احلي صور عمرو دياب وهو بيغني
صور عمرو دياب 2013
صور عمرو دياب 2013

صور عمرو دياب 2013
صور عمرو دياب 2013

صور عمرو دياب 2013
صور عمرو دياب 2013

صور عمرو دياب 2013
صور عمرو دياب 2013

صور عمرو دياب 2013
صور عمرو دياب 2013

صور عمرو دياب 2013
صور عمرو دياب 2013

صور عمرو دياب 2013
صور عمرو دياب 2013

صور عمرو دياب 2013
صور عمرو دياب 2013

ملابس صيف 2013 - احدث موديلات ملابس صيف 2013 روشة Clothing Summer 2013

بعد التحية اعزائي واحباء زوار مدونة ازياء فرجينيا احب اقدملكم ومع بداية صيف 2013 احدث ملابس صيف 2013 وارقي الموديلات التي طلت به علينا كثيرا من مصممي الفساتين ونجوم الموضة من جميع الازواق بجميع الالوان فهي من اورع ملابس صيف 2013 التي تنال اعجاب الكثيرين من مهتمي ب موضيه صيف 2013 و سوف تكون عند حسن ظنكم مقدمة لكل عشاق الموضه العالمية فقط وحصري احلي ملابس صيف 2013 .

ملابس صيف 2013
ملابس صيف 2013

ملابس صيف 2013
ملابس صيف 2013

ملابس صيف 2013
ملابس صيف 2013

ملابس صيف 2013
ملابس صيف 2013

ملابس صيف 2013
ملابس صيف 2013

ملابس صيف 2013
ملابس صيف 2013

ملابس صيف 2013
ملابس صيف 2013

ملابس صيف 2013
ملابس صيف 2013

ملابس صيف 2013
ملابس صيف 2013

ملابس صيف 2013
ملابس صيف 2013

ملابس صيف 2013
ملابس صيف 2013

ملابس صيف 2013
ملابس صيف 2013

ملابس صيف 2013
ملابس صيف 2013


ملابس صيف 2013
ملابس صيف 2013

ملابس صيف 2013
ملابس صيف 2013

ملابس صيف 2013
ملابس صيف 2013