Twitter, @ShealynnsFaerie


Well, friends, I am officially on Twitter. Check it out {HERE}.


Actually, I've been signed up for quite awhile, and have many tweets up. I don't "get" Twitter... it doesn't seem very intuitive, and I haven't spent much time on it to figure everything out. But I do put up random tweets every now and then! Check it out, and follow if you are on Twitter yourself!

Quick and Easy DIY Artwork Holder


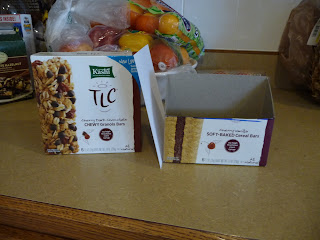
A couple of weeks ago, I was at a small art show, and spent 3 evenings making some small pieces of artwork. I needed something to display them in, and so.... may I present to you, the DIY Artwork Holder Tutorial?

You will need:
A small cardboard box
Scissors
Black paint

The artwork-- SEE MORE { HERE }
Just cut the box out at an angle, paint it black, and stick a nice piece of paper on the front to label it.


(As a side note-- what would you value this sort of drawing at, how much do you think is an appropriate price?)

DIY Earring Display Rack

I apologize that none of these photos are edited. As many of you are aware, my software is non-functioning at the moment.

Here are 2 ways to make cheap and easy earring display racks!

Last week, I participated in an art show. I needed some displays for my jewelry, but was functioning on little time and a tiny budget. Earrings are particularly hard to display, especially on a time-crunch and with no money to spend on displays.

The first display is SUPER DUPER EASY and works for many more things than earrings.

Earring/Jewelry Standing Display

You will need:
A shoebox
(lid is optional)
Black paint
Sewing pins
A rock
(jewelry cards, optional)


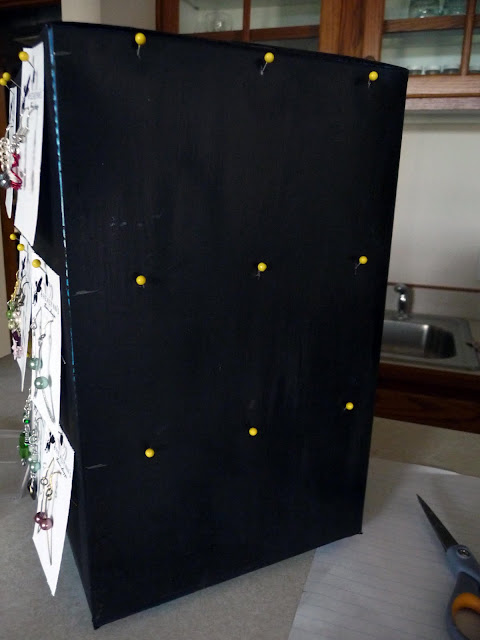
Step One: Take a shoebox and paint it black. (I used acrylic paints, which did get a couple of scratches) Optional: paint the lid, too.

Step Two: Poke sewing pins into the bottom of the box. Use whatever spacing you desire. Optional: do the same to the front of the lid.

Step Three: Stand the box upright and use a rock to hold it steady. Optional: use the lid to help the box stand up-- you now have a two-sided display.

Step Four: Hang jewelry, earring cards, etc, on the sewing pins!


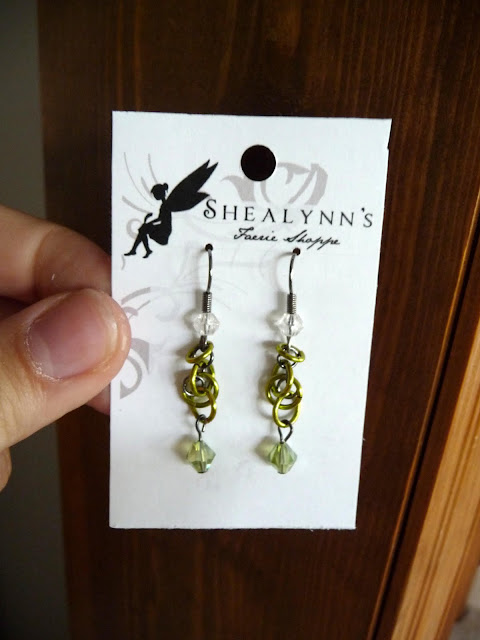
See how easy that is? And I got a nice, classy black background for my jewelry! (I didn't use it for earring cards, but you can see how these would hang-- just like the jewelry set on the card there.)


Lazy Susan Earring Rack

 I've seen turn-table, lazy-susan racks for earring cards before, and decided to make my own!

You will need:
Something that spins like a lazy susan (I used a turning spice rack)
A large cereal box
Black paint
Duct tape
Sewing pins
Earring cards

This craft was not ideal (the black paint started to scratch and Mom needed her spice rack back, so it is not permanent), but it works wonderfully in a pinch! The fact that it spins means that you can display many more earrings in a small amount of space.


Step One: Find a spice rack (or other lazy susan/ spinning device) and large cereal box.

A note on the cereal box: We have a large family and buy things in bulk at places like Costco. This cereal box is about 3 to 4 times the size of an "ordinary" box and it almost completely square. (And no, we don't usually get chocolate cheerios. That was a special treat!!!)


Step Two: Make sure the sizes are right, and trim off the box's flaps. (And remove the spice containers)


Step Three: Create new flaps so that the box will fold snugly over the spice rack.


Step Four: Paint the box black.


Step Five: Tape the bottom of the box onto the spice rack.


Step Six: Poke sewing pins into the box. Be sure to avoid the wood of the spice rack (this was actually very easy, since the holes for the spice containers were exactly where I wanted to stick the pins).


The last step is to hang the earring cards.


My earring cards were very easy-- I have always made cards to hang my earrings on. They are basically business card sized pieces of paper that I use small hole punches to hang the earrings on. (I print them out on cardstock and cut them to size)

I had to adjust the cards in order to hang them on this rack. I printed out the cards on the cardstock, but cut them so that there was blank white space above the graphics. I used a hole punch on this space, and hung it on the sewing needle that way.


Here is is on my table (set up in the basement for trial).
Craft Fair

 As my Facebook fans know, I recently attended an Art Show. It was a very small event, but a good experience. You can see some pictures of it { here }-- my booth is the last two pictures.

I had about a five day's heads up. Five days to figure out displays, print business cards, price everything, and work on more displays. Five days of hard work after school and activities.


These are photos of my table set up in our basement. As you can see, I re-purposed our toy castle-- I snatched half of it. :) It's back to being destroyed by Lego cannonballs now.


All of my displays are DIY (aside from the castle, I guess). The artwork display, the earring rack, the necklace mannequin, the cones for displaying necklaces, the earring stands and rocks for the Evenstar sets...


Speaking of art... a fair portion of the time was spent making a ton of drawings. What you see above ain't even all. 

These are the sorts of artwork that fill my sketchbooks-- only I challenged myself to use almost every medium I know. This was also the first time I have done much with watercolors for over 3 years.

Want to see all of the artwork? Check it out { HERE } !


This week... keep an eye out, because I have a few tutorials on making the displays that I used!

A Flower Garden

Life. How crazy it is!

These past few weeks have been busy. Friends, family, fun... finishing schoolwork, cleaning the house...

enjoying long hours out in the heat of summer afternoons, wearing a floppy hat, and playing with various circus toys... building swingsets with my dad and brothers... sleeping in as late as I want... taking more time for prayer... :)


I'm sorry for the complete lack of posts these past few weeks. Over the last couple of months, I've found myself prioritizing the blog and shoppe. As much as I love it, there is so much more to do with life, and so I kind of just stepped back for a few weeks. The breather was nice. :)

And now my camera card is full of a bajillion and one pictures to share with you, my amazing and patient Fairy Peeps.


This is a pendant that I recently made-- and I just keep gushing over it. You see all those little twists and wraps and whatnot? I wrapped that wire around and around and around and around, catching beads here and there, and forming a pretty little garden of flowers!


I love these wirewrapping techniques! This is just a sneak peek-- I have more up my sleeve (hopefully, when I can get more wire!) and a few more finished. But this is my favorite so far. :)

Ren Fest

Hey, everyone. Sorry about the slow posts the last two weeks. I'm still working on schoolwork (today is my last day of school!!!) and I'm preparing for a craft fair!!!

I won't have much time until after the weekend-- so here's a quickie post with pictures. :)

A couple of weeks ago, I went to the Renaissance Festival in our new town. It was alot of fun (although some of the costumes and some of the shows weren't exactly the best). My friends and I had lots of fun exploring!


Our throw-together costumes... peasants/gypsies! (It's amazing what ordinary clothing and the right accessories can do!)


We found a most beautiful little deck to rest on...


I got to meet the amazing folks behind Thyme2Dream!

Here is their booth, where Mr. Hall entertained us with his splendid accent.


We walked in the parade for them. I got to carry a head!

(I went around saying, "I've got a head! I'm holding a head!" the same way that Jack Sparrow says, "I've got a jar of dirt." Yes. I am weird. Oh, and we named the head Cleo.)


There was a musician there playing the dulcimer. He was amazing! One of my friends is big into music, and he was talking about some specifics of his instrument (way over my head)-- all the while playing a lovely jig.


We all enjoyed the jousting!

Well, peeps, that's all for now! I'm off to study and clean my room and make a craft fair/art show display!

Recent Custom Orders

Over the past couple of months, I've had quite a few custom orders. I put a great deal of work into these pieces (it can be pretty hard to figure out just exactly what the customer wants!), but they never get the spotlight on my Shoppe or here.

And so... may I present the  custom orders from the past couple of months? (Or at least the ones that I snagged pictures of before sending them to their new owners!)

And remember... if you see anything that the Shoppe that you would like in different colors or sizes... or if you see something but one this-or-that changed, don't hesitate to email me! See something on the blog or in my gallery? Email! And if you want a specific piece of jewelry, have an idea in your head of what it should look like, but don't see in listed in the Shoppe... just email me!

I'll do my absolute best to help you get the exact piece that you want!

I love custom orders-- I don't have enough $$$ to buy supplies for every piece of jewelry I want to make, but having a custom order gives me the perfect excuse!


These are sacrifice / good deed beads (see my blog post about sacrifice beads HERE). I had one listed on my Shoppe, and was contacted to see if I could make 13 of them! I was ecstatically excited-- it was my first large custom order! 

Plus, the customer had a brilliant idea-- turning them into bracelets!


Just a couple of weeks later, I got another order... this time for 20 sets of beads and in 2 different colors! YAY!

I should probably make more of these to list in the Shoppe... the only problem is that I used up all the medals and need to find a good place to get them at.


A bracelet for my aunt


Her wrist is small, so I had enough jumprings left over to make a pair of earrings and a necklace!


An Evenstar with custom earrings to match-- this is reversible! One side is green and the other a silvery white!


My favorite Fireworks Earrings in bright colors.


OK-- so this one wasn't a custom order. I made these Elegant Fireworks Earrings as a birthday present for a friend.


Two pairs of leaf earrings!


Two more pairs of leaf earrings!


More Fireworks Earrings... in fun colors and with an extra touch of sparkle. They were made to match a necklace that had been on my Shoppe:


Another not-custom-order-- decorated bobby pins. Not sure why these were in my Custom Orders file, but they were, so here's the picture! :)


This order was sooooo much fun! 3 sets of Fireworks earrings and necklaces in beautiful colors! Doing 3 helped me to perfect the design. :)


Oh, I might have gone camera crazy. Just maybe? I made this order while my little photography setup was set up, so of course I had to go picture crazy.


ShealynnsFaerieShoppe {at} gmail {dot} com