Evenstars of Undomiel

Evenstars-- click on picture for more detail
Well, I have finally gotten around to updating. :) Theses are from my teaser.


Here are my Evenstars! (I've since given most of them away). The white one is actually the cheap $3 Halloween version that I refinished.

The gold evenstar on the left is made out of Sculpey Clay. I lay my evenstar on top of the clay, cut it out with a toothpick, pressed glass beads into the clay, pressed a wire loop in, and etched the designs. Then: I baked it! Voila! Were I to do it again, I would make the back more like the one in the movies, with a leaf design that stretches all the way to the back.

The very middle necklace is the very first Evenstar I ever made. It is part of my still-mostly secret Halloween costume (see here and here). The rest are the same, with different colors and some modifications to be sturdier.

_____________________________________________
The Evenstar Gallery
click to enlarge the images 

see more on my facebook page


Front
Back


The Front
The Back
Variation-- "Fair Isle" Flower

Another teaser from your terrible blogger

Now that I have effectively spent far too long online and have to finish up schoolwork, I thought I would leave you all with a teaser. :)

Instructions for ALL the crafts in this picture coming up! ...soon(ish)...
More Ink and Fairydust magazines with articles by yours truly...
And a description of why styluses don't work on iPod touches/iPhones, and how to make your own stylus that will work.

Faerie Hair Clip

Another hair clip, made from beads and wire tightly twisted around a hair clip.

It was very difficult to wrap the wire around the clip so that it stays in place. I used floral (thin) wire, and wrapped it around my loops and beads, which were done with an 18 or 20 guage wire (I forgot). Remember: a good pair of pliers are your best friend!

EDIT:
Here is a much better picture of my first Elvish hair clip: 


SEE ALSO:

More Hair Clips

And this is featured in my posts:
Masquerade Costume
Shadow of the Bear Artfire

Rosary Bracelet in Red and White

 
I made this rosary bracelet out of the wonderful crucifix beads from BrightlingsBeads. This bracelet didn't turn out quite like I had hoped... too big. Oh, well. 
I made my own clasp, and used these instructions to bead it together.

Some Jewelry

I am doing a Valentine's Day swap with some members of my fourm; I went overboard and took it as an excuse to make a bunch of little crafts... Not even related to Valentine's Day. :) I think I put most of them in that picture of random recent crafts on this post. Some of these things are for the swap.
Here you can see three rings that I made. I really can't give instructions because I made it up as I went along.

Gimli's axe is made out of Scupley clay. I cut it with a toothpick.

 
Here are two more Washer Necklaces

A Snowman and 30ft Dragon

A few posts ago I mentioned Sir Herbert the snowman, who is pictured below...


We now have two more creations covering our lawn. All done out of two inches of slushy snow ontop of one inch of old snow.

I am pleased to announce the presence of Mr. George Snowman.


And The Dragon. The dragon was a full family effort. It used up much snow from the backyard, and spans THIRTY FEET. I made the head. :)


You might notice that the little dark spot on the right hand side of the picture is my brother. :)

I am going to figure out a way for you to see all the awesome pictures I took without cluttering up the blog with far too many pictures.

Like I said, these belong on the blog because they are snow sculptures and sculptures are art. :)

Teaser

Yes, I am teasing you, my kind readers.With a photo of recent craft projects. I will write a post about each and every one, hopefully including some instructions. And, yes, the envelope is a craft. You shall see.

Oh, I am also working on a hand-drawn animation with someone who lives halfway across the country.

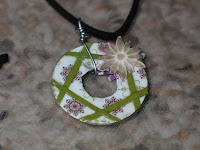
How to Make Your Own Washer Necklace

What you need:
-A washer of desired size
-Wire
-Patterned and/or decorated paper
-Sissors
-Decopauge glue (like Mod Podge)

Step one: Decorate your paper, trace the washer onto it, cut it out.

Step two: 1) Apply a layer of glue, attach paper. Dry for five minutes. 2) Add a layer of glue on top of the paper. Dry fifteen minutes. Repeat 2 as much as desired.
Step three: Repeat one and two for the back of the washer.

Step four: Wrap the wire around the hole in the wire and make a loop at the top.

Step five: Thread string through, and tie off. TADAH!!!

Here are pictures of the front and back of my washer necklace. You can see that I added strips of paper and a stamped flower.

To see some more of my washer necklaces, please look


Two Paintings

I apologize for the awful pictures here. :( I assure you that my paintings are not blobs of blurry, yellow color. But I had already given both of the paintings before I discovered that the picture was rather terrible.

These are acrylic. The top one was 20 something inches and the bottom was 11 or 14. Both are "mounted" canvas, which means they have about an inch of space that they stick out. I really like that, because I can paint the sides and they don't need a frame.

 
I *actually* based this painting off another one. :) It was a random cardboard print on our wall that was terribly faded. Of course, my version took its own little twists. Dad took this for his office at work! :D :D :D

A Christmas present for my Papa (Grandpa). He loves pool. :)

Gryffindor/Homeschool Spirit Gloves

I made these crocheted gloves for my brother a few months ago. They are Gryffindor colors to go with the hat I made him early (and a scarf for my other brother). I also called them "Homeschool Spirit" because they are the "official" colors of our family's homeschool. Red for the Sacred Heart and yellow/gold for... I forget. It meant something about God's glory.

I made up the pattern for the gloves. Hooray for improvisation and not understanding most crochet patterns!

The only picture I could get of him. Little boys (excuse me... big boys) tend to be camera shy unless they can make ridiculous faces at the camera.

To Make a 6 Year Old Squeal...

...all you have to do is give her a set of jewelry-- complete with clip on earrings. I made these for my sister's birthday a few months back. Only picture I have, sorry. But who minds seeing a cute little girl in a picture with jewelry, anyhow? (I didn't make the necklace, it was her present from Dad a few birthdays ago. She loves it, so I made her a bracelt and clip on earrings to match)

Epic Fail

 
This was supposed to be a beautiful necklace for my Grandma. I was going to dangle little pearls on it... only after I put this much together did I realize-- the pearls were too small to fit my wire. :( It turned out all right because I made something else for my grandma, but it sure bothered me then! Anyway, found this picture and thought I'd post it, just because.

Sir Herbert, the Snowman

 
This is art, right? I can put it on the blog. After all, it is a snow sculpture!
This snowman is named Sir Herbert. (Sherbert). Dad did alot of the face and I did most of the hand. I can forsee a tradition going on here. Especially when we get more than three inches of snow.

One man's junk is another man's treasure...

...or however that quote goes.

Does the picture above make your fingers itch and your imagination run on end? 
Those are all random trinkets I found lying around the house. I am sure I will uncover more when we move and get the boxes out of storage.
I am not sure what to do with a broken zipper, belt loop, or spiral paper clip, but I can assure you whatever I make will be... interesting.

Look what else I found! And old watch. The wriststrap was missing, the battery was rusty, and it was salvaged from the "junk/to be sorted box".

The actual watch case would make a great locket bracelet. I could imagine something romantic like a lock of a loved one's hair or sentimental like a picture of your family. But, me being me, I am more likely to build a miniature Narnia in there. :)

With the help of a handy screwdriver, I pried the watch face off the gears without breaking anything. I am very proud of myself. I was able to reattach the hour and minute hands, but I'm sure you can see the tiny, lonesome second hand... just lying there...

Let's see what I do with all this mess!

Glimpses Into An Artist's Mess

I have to say, I have a great talent for making messes. Much as I love tidiness, I rarely feel like actually cleaning. Organizing-- love. Cleaning-- hate. I do make myself actually clean, because I do dislike mess, but its... cleaning.

But when it comes to actually working on art/craft projects, I'm content with mess. :) And while it may not look very organized, be warned that I can remember where everything is and shall bite your head off if you mess with my messy unorganized style of organization. :)

Here are some glimpses:

This was during my very first jewelry "spree". Boy, was I making things left and right! This is on my desk in my bedroom. Made it a bit hard to set schoolbooks on there. :)

A lamp makes an excellent place to dangle jewelry from... it was much more organized there than in the box where it is currently all crammed. :P The poor lamp has left me, sadly. It suffered a dramatic fate at the hands of my little brother.


...I had another picture of my yarn basket, which was overflowing beautifully, like a waterfall... only the picture as disapeared. So you only get one glimpse today. Sorry.