Arwen's Coronation Banner

I love The Lord of the Rings. Can I emphasize that any more? I love The Lord of the Rings.     When we move, I have decided to decorate my room in an Elvish style... and Mom and Dad have commissioned me to do a major LotR mural in the media room...

     I needed practice! Or, I just wanted to have fun with it. :) This is Arwen's coronation banner in The Return of the King. Sorry for the picture qualtiy-- the material I used catches the light!
    
     I made this banner out of a scrap from my Arwen costume I had way back in... fourth or fifth grade. The scraps were funny shapes, and it was hard to find one big enough. (Of course, when I was done with this, I found a giant scrap... the way things work...) I think this is simply lining material.

     As you can see, I did not cut it properly. If you are going to attempt this banner, please do not do the same mistakes I did. Make sure you cut out the shape symetrically and make sure that your pictures align.

     First, cut out the fabric. Then, hem the edges. I did not want to get out the sewing machine so I used felt glue-- and it is holding securely. Next, sketch the design onto the banner. If you use a gray Crayola marker on the lining material, it will disapear after a few hours. So messups are okay. :)

    Now comes the fun part! Get out a couple of paintbrushes and a whole lot of white acrylic paint. Because you are painting on fabric, you can't water down the pain a whole lot, so be prepared to spend at least an hour painting.

     Next, sew or glue the thingies on the top. Do those thingies that hold the banner to its pole have a name? Oh, well. Thread a dowel (or a stick that your brother sanded for your other brother to use as a wand... as the case may be) through the "thingies", and voila! You have a hanging banner! If you want to hold it like Arwen did, you will need another stick.

     Here are the only two screenshots I could find of the coronation scene and banner. I used the Lord of the Rings Costume Research site's diagrams for the design (I found it interesting that the White Tree of Gondor is an Elvish design on the banner, not the typical design found in Gondor!).

EDIT:
You can see this banner in action in my Masquerade Costume post.

Second Edit:
Here are some candid shots of my brother, in his Aragorn costume, with the banner.


Gouache


There are definate ups and downs to being an entirely self-taught artist. One definate down is being clueless when it comes to new mediums.

Two days ago, Mom emerged from the garage carrying a box (which she had gone in to get) and a smaller box of paints. "I forgot about these," she said. "I meant to give them to you for Christmas-- I don't know what they are but they were cheap. Gooou...ache? Do you know what that is?"

Of course I knew! ...a bit. I knew that Grandma used white gouache (pronouced gwash, like squash) for some spots on her watercolors. I headed over to handy Google and Wikipedia and discovered that gouache is a chalk-pigment, water-based paint that is essentially an opague watercolor. Apparently it is favored by illustrators and animators from way back when movies were animated by hand-drawn cels.

That is all I could find, so I set off to ease my itching fingers and experiment. :) My first attempt is shown above. It is a scene from The Magician's Nephew by C.S. Lewis. It is supposed to be when Polly and Digory are in the Wood Between the Worlds and are peering into the pool that leads to Narnia. I tried basing it off of the various illustrations by Pauline B. (forget her name...). In that picture, I used the guoache like watercolors. It didn't turn out very well because 1) I stink at anything watercolor-related and 2) I didn't think to do a real underlying sketch so Polly and Digory look strange.

This was my second attempt.


The angle I shot the picture from is a little weird. :P Gouache is really interesting, because I can make the background look like watercolor, the foreground look like chalk, and the subject like acyrlic. I can't quite make it out... it feels funny on the brush, but that is what experimenting is for!

And... terrible... horrible... *groans*.... But I did tell myself I would chronicle my first attempts at gouache... Well, it just goes to show that all experimenting doesn't work out. :)

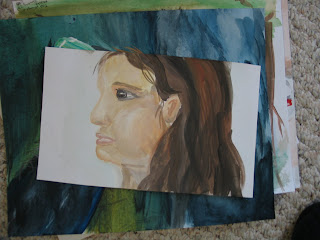
This was my third, and most recent painting. I had no underlying sketch, hence the terrible proportions. And I had to improvise color wise, because I rely heavily on raw umber when painting a person with acyrlics. My gouache set had no raw umber, so I mixed burnt seinna, black, an orangey yellow, and red. Anywho. Prepare to die from my Medusa-like painting. :(


It's a new medium, what can I say?

But I think I will grow to like it. :)

Refinishing the Evenstar

I am a Lord of the Rings fan, and several years ago I was Arwen for Halloween. Mom found an Evenstar pendant for $3, and it has been a favorite peice of fun jewelry. But I had never liked the fact that it looked so fake.

So, of course I had to fix that. :) I remember reading on the LotR costume research site that the cheap Evenstar had a white film on it that made it look so fake. I'm sure that the film was there to keep the necklace from getting rusty or something, but my Evenstar was old enough (not to mention broken-- one of the "jewels" has been missing for years) that it couldn't hurt it very much.

Out came the X-acto knife, and I set to work scraping the film off. I was surprised at how different it looks! Here are the before and after pictures (sorry about the picture quality, my bedroom has got bad lighting). The pictures don't really do it justice. Especially because of the different lighting.


Here is a picture of the (now seven dollar) Halloween version, the seventy dollar "real" version, and the fundred and fifty dollar "replica" version.


Christmas Earrings


Here's for a short post! Hear, hear!
Well, I made these earrings to go with my Christmas outfit. That is about it. :) You might notice that I replaced the metal ball that comes on the earring hooks and replaced them with green seed beads.
These were so easy, that when Mom mentioned she would like a pair for her Christmas outfit, I had them finished in fifteen minutes.

Half Done...

Well, the blog is in a halfways organized mode right now, and I am going to have to leave it at that for now. There are two choices: spend the time messing with HTML, or spend the time posting. I'm going for the latter.

Randomness

Just letting you all know that I have many, many little crafts I have finished recently-- I just haven't gotten them up yet. I'll do so when I can get on the computer that has paint shop (because for some reason, the lighting in the pictures is terrible!!!). I also plan on fixing the blog so it doesn't look like a random bunch of discobobulated pictures and bits of text. :P Slightly more organized. Have patience!

While you wait, why don't you read my funny little essay on lembas bread and Twinkies? It is not even edited yet but I thought that it wasn't fair for you to go without something to do. :P I wrote it for my composition essay.


Oh, don't forget to learn a bit more about Tolkien! This one is not funny-- but it will teach you a bit about his Elvish characters.

A Little Present


This painting was really fun! I based it off a random picture I saw online. Not sure why the battery is in the picture. :P

Calligraphy


I calligraphied this for my brother's First Communion last spring. It is hard to follow... the blue writing hops from one side of the circle to the other. :P Oh well.

A Tesselation


This is a tesselation I made for my geometry project. The little shapes are ghosts. :P It is really hard to see the patterns in it, probably because I used too many. The center ones are a color wheel, and the rainbow extends from each color. Plus, the colors go light to dark. This really didn't turn out (artistically)... but I'm posting it for something to do.

Corner Bookmarks

I made these "corner bookmarks" for some friends, using Mom's Stampin' Up! stuff. It is basically a rectangle with the two top corners folded in, and a little punched out peice of paper stuck on the right hand folded corner. They slide over the corner of the page to keep your place with style. :)

Gryffindor Banner


My brother and I made this Gryffindor banner for his bedroom. It is a white peice of cardstock on top, with a printed-out Gryffindor crest glued on. The bottom was two peices of cardstock and a gazzilion gold squares glued on. He loves it. :)
With different color schemes, one could be made for any Hogwarts house.

An old Egyptian Necklace


I made this back in, oh, sixth grade? It was part of a project for school (I wish I could do things like that for school now that I am in highschool!). I was studying the ancient Egyptians. I made each of the beads out of Sculpey clay and strung it together with thread. I think the use of safety pins as clasps was rather ingenious. :P

It is amazing what you find when you clean out "sort boxes".

Christmas Tags


My mom and I made these tags and paper ornaments with her Stampin' Up! stuff. You can't really see how pretty the paper is, sorry about that. :P

A Pink Jewelry Set

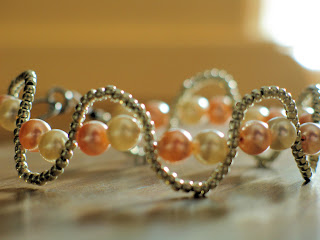
Meandering swirls of silver surround pink and white glass pears in this jewelry set I made my aunt for Christmas. Although my aunt probably would not like my analogy, this is a Fairytale Princess set.


I was very surprised at how it actually worked, and never once did I have to pull it apart and start experimenting again! I will attempt to give directions-- but if you want to try this, you are going to have to wing it.


What you will need

• 50 something beads, size 6 to 7 millimeters (I used a mix of pink and white Swavorski Crystal glass pearls)

• A bag or two of seed beads (no way I am counting how many I used)

• Floral wire-- a looong peice

• Beading wire/string (make sure it is DURABLE! and it needs to be a few inches longer than the necklace is supposed to be)

• A centerpeice (I used a pink glass donut)

• Earring hooks

• Crimp beads (you don't need this, but it keeps your ends together! I just used normal pliers instead of buying fancy crimping ones)

• Clasps (or make your own)

• Pliers and wire cutters

To start, attach a clasp to the beading string and tie off one end (I used a crimp bead rather than tying). Then, wrap the floral wire around the same end of the string, so it is attached securely.

Put two beads (I used pink/white pearls) and then ONE seed bead onto the string. Make sure they do not go flying off. Next, put seed beads (I used around 12) onto the floral wire. Now, thread the floral wire through the seed bead that is on the beading string. Push the floral wire into shape. You will have to push it in such a way that there are no gaps between the beads on the string. Viola! One little twist done!
Repeat. And repeat. And repeat. Continue repeating until you have reached the middle of the necklace. String on your centerpice. Continue repeating.
Once you have reached the end of the necklace, tie the floral wire to the string, cut the ends. Then, attach the second part of the clasp to the string and tie off (or use a crimp bead).
Instead of just using clasps, I also put some chain on the back of the necklace to make it longer.


The finished necklace. This took me several hours, but its worth it, isn't it?


For the bracelet, you do the exact same thing that you did for the necklace. Be sure that the bracelet is the right size-- wrists tend to vary a good deal.
Remember: put two beads and a seed bead on the string. Thread seed beads onto wire. Insert wire through the seed bead on the string and pull into place.


And now it is time for the earrings! Take a headpin (a bit of wire shaped like a nail, can be found at most any craft store, and Walmart) and wrap the floral wire carefully around the head. Put a bead (pearl) onto the headpin. Now, put some seedbeads (I used 6) onto the floral wire. Wrap the wire around the top of the bead, once. Now, put the second bead onto the headpin. Put seed beads onto the wire and securely wrap around the top of the second bead. Trim floral wire. Cut and loop the ends of the headpin, then attach to the earring hooks.


Please tell me if you have any questions about making these! Also, tell me what you think. :) This is my favorite set so far.